本篇详细介绍了iai-kinect2功能包,在此基础上通过iai-kinect2获取深度图像,从而进行ROS中的开发。

ROS杂篇 ROS中使用Kinect V2 Part2:iai-kinect2使用
前言:为什么要写这篇博客
在上一篇中,我们介绍了如何在Ubuntu上安装Kinect V2的开原驱动:libfrenect2,以及如何安装在ROS中使用libfrenect2获取深度图像的功能包iai-kinect2。然而在上一篇文章的最后,我们只是简单的使用了一下iai-kinect2功能包。但是我们通过rostopic list却看到了非常多的话题,那么这些话题之间到底是什么关系呢?又该如何基于iai-kinect2进行深度开发呢?
本节就将在上一篇的基础上,在介绍iai-kinect2的基础上,利用iai-kinect2进行开发。如果没有看过第一篇文章、没有配置好环境,先按照第一篇文章中的教程跟着来。
废话不多说,下面就开始吧。
1. 什么是iai-kinect2?
我认为合理的学习方法:学什么前,先问是什么,再问为什么学(学习这个东西的目的),搞懂学了能为我们带来那些帮助,最后再开始学
如果你有看过我的上一篇博客的话,你应该就会知道,iai-kinect2是ROS的一个功能包,他的作用在于调用了libfreenect2驱动来获得Kinect V2相机得到的深度图像以及通过OpenGL、CUDA、CPU等平台极大地提升了渲染速度和适应性。最终实现了多平台下深度图像30 FPS的性能。
下面是对iai-kinect2的更加详细的介绍
A. 谁开发的iai-kinect2?
iai-kinect2是由德国不莱梅大学(University of Bremen)的博士生Thiemo Wiedemeyer。他在2013年的时候去不莱梅大学的人工智能研究所读博的时候开发出了iai-kinect2。在2014年的时候,经过几个月的开发,他和他组里的另外一个负责串口相关部分的博士生合作,最终完成了这个非常好用的库,并在ROS的论坛上发布了这一消息。

B. iai-kinect2的组成
前面我们只是从大体上直到了iai-kinect2是一个ROS的功能包,他调用了libfreenect2来获取深度图像。其实更准确的说,iai-kinect2是ROS的一个元功能包。
什么是元功能包?
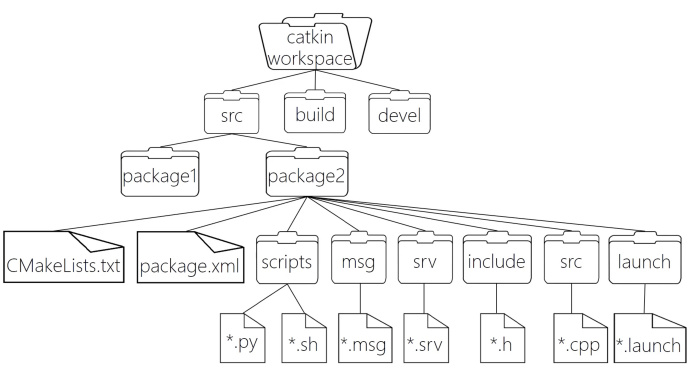
ROS中有一些基础的概念:工作空间、源码空间、编译空间、开发空间、功能包、元功能包、发行版等等。通常我们工作是在一个工作空间中,这个工作空间中包含了我们开发的一切:我们的源代码、生成的库文件、生成的头文件、得到的可执行文件……而我们写的代码都以功能包的形式组织起来,我们在发布代码的时候就是以功能包的形式进行发布。而通常几个具有相关功能的功能包组合在一起就是一个元功能包,我们通过元功能包将几个功能包组合起来,使得他们成为一个整体来进行发布。
在下图中,我们所有的代码都在catkin_workspace这个工作空间中(挖个坑,以后写写文章讲讲什么是
catkin)。而具体来说,我们的源代码存放在src源码空间中,我们通过catkin_make会对我们所有的源代码进行编译,编译过程中产生的中间文件,例如Cmake的module以及Makefile等等都在build编译空间中。我们最后的可执行文件和我们自己写的库文件都在devel开发空间中。对于源码空间中,一个package就负责实现一个具体的功能,例如读取摄像头、抓取物体等等。如果package1和package2有所关联,例如package1是读取摄像头的功能包,而package2是驱动机械臂的功能包,那么他们两个在一起可以完成机器人抓取物体这个功能,那么这个时候,我们就可以新建一个功能包,这个功能包什么都没有,只有表明这两个功能包在一起组成一个元功能包的配置信息,即描述元功能包架构的功能包。在下面就是iai-kinect2这个功能包
具体来说,iai-kinect2这个元功能包由几个功能包组成:iai-kinect2(元功能包描述功能包)、kinect2_bridge(负责调用libfreenect2、OpenGL获取图像的功能包)、kinect_calibration(提供了Kinect V2相机GUI校准的功能包)、kinect_registration(负责点云和深度图像配准的功能包)以及kinect_viewer(提供了简单的可视化功能的功能包)。
具体功能包的架构可以看下图

C. iai-kinect2的功能
关于iai-kinect2的功能,我们前面其实已经体验过了他的可视化和获取深度图像以及点云和彩色图像的配准。因此这里主要关注iai-kinect2中的标定功能。
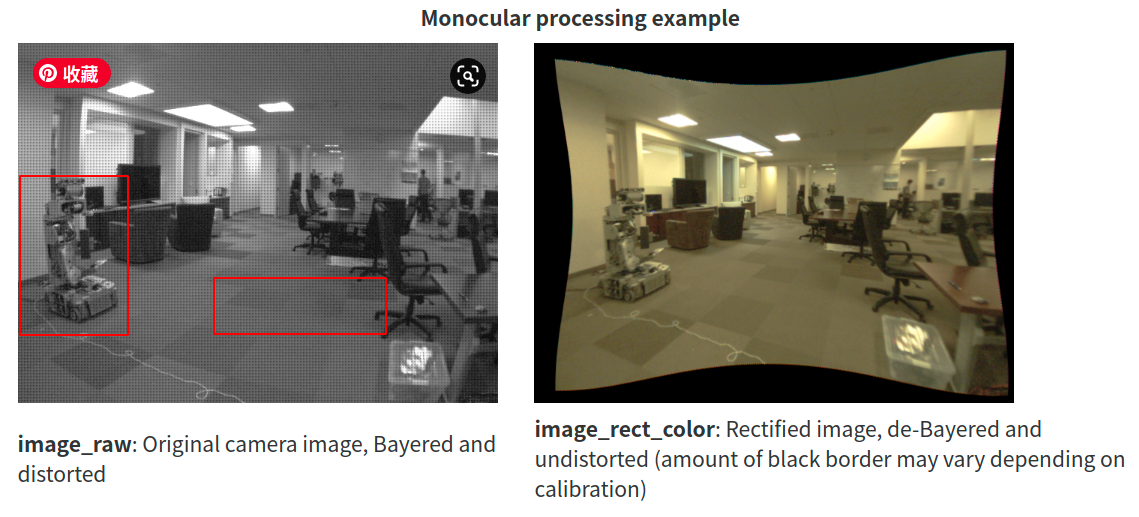
众所周知,我们利用相机除了拍照以外,还有一个重要的功能就是从相机获取的图像信息出发计算三维空间中物体的几何信息并由此重建和识别物体。这也是计算机视觉的基本任务之一。那么我们在进行推断的时候就存在一些问题,其中最主要的一个问题就是相机的镜头畸变,即由于相机的镜头是一个凹透镜导致物体间真实的距离被扭曲。因此我们需要通过一些手段来进行修正。进行修正之后会得到一些参数,利用这些参数我们就可以对畸变的图像进行修正,以实现获得物体间精准的位置。由于这个参数和相机的镜头、角度有关,因此他们又叫做相机参数。通过标定我们就能够获得这些参数。
例如在下图中,我们可以直到机器人和地板的线都应该是直线,但是由于畸变导致原本直的线歪曲,这个现象在图像边缘处尤为明显。
当然除了畸变以外还有世界坐标转相机坐标等等问题,他们统称为相机参数。
关于相机标定的更多内容,推荐参考搜狐上的博客:https://www.sohu.com/a/336803765_120071391
iai-kinect2中直接提供了用于相机标定的程序,因此我们可以直接在命令行中进行调用即可。关于如何进行校准,参考github上的readme
最终通过标定,可以实现的效果如下。可以看出来,原本倾斜的图像被校准了。
2. iai-kinect2的使用
我们在下面将对iai-kinect2的使用进行介绍,不过需要说明的是:由于iai-kinect2的代码非常好,将自己尽可能的低耦合,因此其所有的依赖都是ROS的标准消息。因此,我们学习iai-kinect2的使用主要是从下面两个方面去学习
iai-kinect2中使用的ROS的标准消息:Image和CompressedImageiai-kinect2中每个话题的含义和作用
A. ROS中Image和CompressedImage
ROS中为图像数据提供了两个官方的消息类型:Image和CompressedImage。其中Image是没有经过压缩的图片而CompressedImage则是经过压缩的图片。由与ROS中的所有的消息其实都是基于std_msgs提供的基础数据类型上定义的,因此Image和CompressedImage也不例外。具体来说,图片本身是用一个装着字节流的数组保存的,而图片的frame_id和对应的相机信息等等都是有对应的项。
消息定义
首先是Image消息的定义,可以看到header中提供时间戳等信息,而图像的长宽、字节序、编码方式等等内容都是用于帮助解码data字节流的。此外也能够看到,ROS中的图像每一个像素都是用一个8位无符号整数描述的。
# This message contains an uncompressed image
# (0, 0) is at top-left corner of image
#

Header header        # Header timestamp should be acquisition time of image
                     # Header frame_id should be optical frame of camera
                     # origin of frame should be optical center of camera
                     # +x should point to the right in the image
                     # +y should point down in the image
                     # +z should point into to plane of the image
                     # If the frame_id here and the frame_id of the CameraInfo
                     # message associated with the image conflict
                     # the behavior is undefined

uint32 height         # image height, that is, number of rows
uint32 width          # image width, that is, number of columns

# The legal values for encoding are in file src/image_encodings.cpp
# If you want to standardize a new string format, join
# ros-users@lists.sourceforge.net and send an email proposing a new encoding.

string encoding       # Encoding of pixels -- channel meaning, ordering, size
                      # taken from the list of strings in include/sensor_msgs/image_encodings.h

uint8 is_bigendian    # is this data bigendian?
uint32 step           # Full row length in bytes
uint8[] data          # actual matrix data, size is (step * rows)
类似的,CompressedImage则是经过压缩的图像,具体的压缩方式就是使用jpg、png等编码格式,因此图像的编码方式是固定的
Header header        # Header timestamp should be acquisition time of image
                     # Header frame_id should be optical frame of camera
                     # origin of frame should be optical center of camera
                     # +x should point to the right in the image
                     # +y should point down in the image
                     # +z should point into to plane of the image

string format        # Specifies the format of the data
                     #   Acceptable values:
                     #     jpeg, png
uint8[] data         # Compressed image buffer
最后需要注意的是iai-kinect2中还用到了camerainfo这个ROS的官方消息,其内容如下,主要定义了相机的内外参数,获取图像的分辨率等信息
# This message defines meta information for a camera. It should be in a
# camera namespace on topic "camera_info" and accompanied by up to five
# image topics named:
#
#   image_raw - raw data from the camera driver, possibly Bayer encoded
#   image            - monochrome, distorted
#   image_color      - color, distorted
#   image_rect       - monochrome, rectified
#   image_rect_color - color, rectified
#
# The image_pipeline contains packages (image_proc, stereo_image_proc)
# for producing the four processed image topics from image_raw and
# camera_info. The meaning of the camera parameters are described in
# detail at http://www.ros.org/wiki/image_pipeline/CameraInfo.
#
# The image_geometry package provides a user-friendly interface to
# common operations using this meta information. If you want to, e.g.,
# project a 3d point into image coordinates, we strongly recommend
# using image_geometry.
#
# If the camera is uncalibrated, the matrices D, K, R, P should be left
# zeroed out. In particular, clients may assume that K[0] == 0.0
# indicates an uncalibrated camera.

#######################################################################
#                     Image acquisition info                          #
#######################################################################

# Time of image acquisition, camera coordinate frame ID
Header header    # Header timestamp should be acquisition time of image
                 # Header frame_id should be optical frame of camera
                 # origin of frame should be optical center of camera
                 # +x should point to the right in the image
                 # +y should point down in the image
                 # +z should point into the plane of the image


#######################################################################
#                      Calibration Parameters                         #
#######################################################################
# These are fixed during camera calibration. Their values will be the #
# same in all messages until the camera is recalibrated. Note that    #
# self-calibrating systems may "recalibrate" frequently.              #
#                                                                     #
# The internal parameters can be used to warp a raw (distorted) image #
# to:                                                                 #
#   1. An undistorted image (requires D and K)                        #
#   2. A rectified image (requires D, K, R)                           #
# The projection matrix P projects 3D points into the rectified image.#
#######################################################################

# The image dimensions with which the camera was calibrated. Normally
# this will be the full camera resolution in pixels.
uint32 height
uint32 width

# The distortion model used. Supported models are listed in
# sensor_msgs/distortion_models.h. For most cameras, "plumb_bob" - a
# simple model of radial and tangential distortion - is sufficient.
string distortion_model

# The distortion parameters, size depending on the distortion model.
# For "plumb_bob", the 5 parameters are: (k1, k2, t1, t2, k3).
float64[] D

# Intrinsic camera matrix for the raw (distorted) images.
#     [fx  0 cx]
# K = [ 0 fy cy]
#     [ 0  0  1]
# Projects 3D points in the camera coordinate frame to 2D pixel
# coordinates using the focal lengths (fx, fy) and principal point
# (cx, cy).
float64[9]  K # 3x3 row-major matrix

# Rectification matrix (stereo cameras only)
# A rotation matrix aligning the camera coordinate system to the ideal
# stereo image plane so that epipolar lines in both stereo images are
# parallel.
float64[9]  R # 3x3 row-major matrix

# Projection/camera matrix
#     [fx'  0  cx' Tx]
# P = [ 0  fy' cy' Ty]
#     [ 0   0   1   0]
# By convention, this matrix specifies the intrinsic (camera) matrix
#  of the processed (rectified) image. That is, the left 3x3 portion
#  is the normal camera intrinsic matrix for the rectified image.
# It projects 3D points in the camera coordinate frame to 2D pixel
#  coordinates using the focal lengths (fx', fy') and principal point
#  (cx', cy') - these may differ from the values in K.
# For monocular cameras, Tx = Ty = 0. Normally, monocular cameras will
#  also have R = the identity and P[1:3,1:3] = K.
# For a stereo pair, the fourth column [Tx Ty 0]' is related to the
#  position of the optical center of the second camera in the first
#  camera's frame. We assume Tz = 0 so both cameras are in the same
#  stereo image plane. The first camera always has Tx = Ty = 0. For
#  the right (second) camera of a horizontal stereo pair, Ty = 0 and
#  Tx = -fx' * B, where B is the baseline between the cameras.
# Given a 3D point [X Y Z]', the projection (x, y) of the point onto
#  the rectified image is given by:
#  [u v w]' = P * [X Y Z 1]'
#         x = u / w
#         y = v / w
#  This holds for both images of a stereo pair.
float64[12] P # 3x4 row-major matrix


#######################################################################
#                      Operational Parameters                         #
#######################################################################
# These define the image region actually captured by the camera       #
# driver. Although they affect the geometry of the output image, they #
# may be changed freely without recalibrating the camera.             #
#######################################################################

# Binning refers here to any camera setting which combines rectangular
#  neighborhoods of pixels into larger "super-pixels." It reduces the
#  resolution of the output image to
#  (width / binning_x) x (height / binning_y).
# The default values binning_x = binning_y = 0 is considered the same
#  as binning_x = binning_y = 1 (no subsampling).
uint32 binning_x
uint32 binning_y

# Region of interest (subwindow of full camera resolution), given in
#  full resolution (unbinned) image coordinates. A particular ROI
#  always denotes the same window of pixels on the camera sensor,
#  regardless of binning settings.
# The default setting of roi (all values 0) is considered the same as
#  full resolution (roi.width = width, roi.height = height).
RegionOfInterest roi
关于其他传感器消息,参考roswiki的文章:http://wiki.ros.org/sensor_msgs
关于全部的官方消息,参考roswiki文章:http://wiki.ros.org/common_msgs?distro=noetic
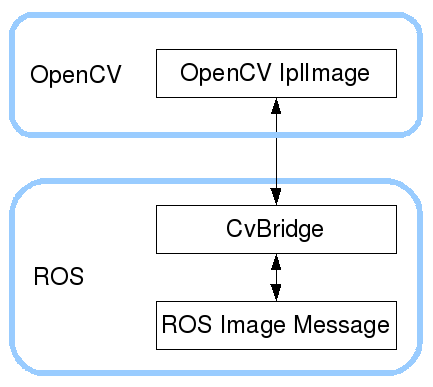
使用cv_bridge转接给OpenCV
需要注意的是,上面的方式的到的图像都是ROS中定义的图像的消息,而ROS中的图像的消息和OpenCV的并不一样,因此如果我们后续还要对图像进行处理的话,就需要将ROS中的图像转变为OpenCV的图像。为此我们就需要使用CV_bridge。
ROS中的图像和OpenCV中的图像不一样的地方在于,ROS是通过字节流以及辅助的解码信息来表示一张图像,而OpenCV则是通过其核心的lplImage数据结构来表示一张图像(lpl表示 Intel Image Processing Library)。lplImage的定义如下,当然我们没必要全部搞懂,看看定义知道不同即可。
此外Python中OpenCV的图像的表示是基于Num Py的,因此还会存在不一样的地方。
typedef struct _IplImage
    {
        int  nSize;         /* IplImage大小 */
        int  ID;            /* 版本 (=0)*/
        int  nChannels;     /* 大多数OPENCV函数支持1,2,3 或 4 个通道 */
        int  alphaChannel;  /* 被OpenCV忽略 */
        int  depth;         /* 像素的位深度: IPL_DEPTH_8U, IPL_DEPTH_8S, IPL_DEPTH_16U,
                               IPL_DEPTH_16S, IPL_DEPTH_32S, IPL_DEPTH_32F and IPL_DEPTH_64F 可支持 */
        char colorModel[4]; /* 被OpenCV忽略 */
        char channelSeq[4]; /* 同上 */
        int  dataOrder;     /* 0 - 交叉存取颜色通道, 1 - 分开的颜色通道.
                               cvCreateImage只能创建交叉存取图像 */
        int  origin;        /* 0 - 顶—左结构,
                               1 - 底—左结构 (Windows bitmaps 风格) */
        int  align;         /* 图像行排列 (4 or 8). OpenCV 忽略它,使用 widthStep 代替 */
        int  width;         /* 图像宽像素数 */
        int  height;        /* 图像高像素数*/
        struct _IplROI *roi;/* 图像感兴趣区域. 当该值非空只对该区域进行处理 */
        struct _IplImage *maskROI; /* 在 OpenCV中必须置NULL */
        void  *imageId;     /* 同上*/
        struct _IplTileInfo *tileInfo; /*同上*/
        int  imageSize;     /* 图像数据大小(在交叉存取格式下imageSize=image->height*image->widthStep),单位字节*/
        char *imageData;  /* 指向排列的图像数据 */
        int  widthStep;   /* 排列的图像行大小,以字节为单位 */
        int  BorderMode[4]; /* 边际结束模式, 被OpenCV忽略 */
        int  BorderConst[4]; /* 同上 */
        char *imageDataOrigin; /* 指针指向一个不同的图像数据结构(不是必须排列的),是为了纠正图像内存分配准备的 */
    }
    IplImage;
所以cv_bridge的功能就是下面这张图中所表述的
更多关于cv_bridge的问题,参考roswiki:https://wiki.ros.org/cv_bridge
此外,需要注意的是,在Melodic下在Python中使用cv_bridge会报错无法加载一个so/dynamic啥啥啥,关于这个问题的解决,先挖个坑,以后再补。
B. iai-kinect2中每个话题的含义和作用
当我们以launch文件的形式运行iai-kinect2后,我们会看到很多的话题,这些话题其实分成三组:hd、qhd和sd。需要注意的是,每组话题下的points话题都只是只有通过launch文件运行才会看到的。
HD话题
HD话题其实指的是高分辨率的图像,由于Kinect V2相比Kinect V1,其图像极限分辨率1920x1080,因此HD话题中所有的图像都是极限分辨率1920x1080的图像
此外,HD话题下发布的color表示是RGB彩色图像、color_rect则是经过畸变处理(rectified)的图像,compressed的则是经过压缩的图像。depth则是深度图,mono则是单色灰度图。
/kinect2/hd/camera_info
/kinect2/hd/image_color
/kinect2/hd/image_color/compressed
/kinect2/hd/image_color_rect
/kinect2/hd/image_color_rect/compressed
/kinect2/hd/image_depth_rect
/kinect2/hd/image_depth_rect/compressed
/kinect2/hd/image_mono
/kinect2/hd/image_mono/compressed
/kinect2/hd/image_mono_rect
/kinect2/hd/image_mono_rect/compressed
/kinect2/hd/points
QHD话题
QHD话题的全称是Quater HD,即该话题是HD话题的1/4。原因在于HD话题下的图片实在是太大了,因此无论是数据的传输还是处理都很慢。所以QHD中的图像是对HD的图像进行降采样之后的图像,长宽各自降采样一半,所以是512x424的图片。因此图像处理起来速度很快
/kinect2/qhd/camera_info
/kinect2/qhd/image_color
/kinect2/qhd/image_color/compressed
/kinect2/qhd/image_color_rect
/kinect2/qhd/image_color_rect/compressed
/kinect2/qhd/image_depth_rect
/kinect2/qhd/image_depth_rect/compressed
/kinect2/qhd/image_mono
/kinect2/qhd/image_mono/compressed
/kinect2/qhd/image_mono_rect
/kinect2/qhd/image_mono_rect/compressed
/kinect2/qhd/points
SD话题
SD话题中的图像都是从相机获得的红外和深度图像,因此大小都是原本的大小:512x424,处理起来速度还是比较快的。
/kinect2/sd/camera_info
/kinect2/sd/image_color_rect
/kinect2/sd/image_color_rect/compressed
/kinect2/sd/image_depth
/kinect2/sd/image_depth/compressed
/kinect2/sd/image_depth_rect
/kinect2/sd/image_depth_rect/compressed
/kinect2/sd/image_ir
/kinect2/sd/image_ir/compressed
/kinect2/sd/image_ir_rect
/kinect2/sd/image_ir_rect/compressed
/kinect2/sd/points
C. launch启动节点时候指定参数
由于iai-kinect2自成一套系统,因此我们没有必要也很难修改他的代码来完成我们需要的功能。为此iai-kinect2的launch文件支持在启动的时候指定参数,来实现不同的功能,具体所有的参数如下
roslaunch kinect2_bridge kinect2_bridge.launch [options:=value]
base_name:=<string>
    default: kinect2
    info:    set base name for all topics
sensor:=<string>
    default:
    info:    serial of the sensor to use
fps_limit:=<double>
    default: -1.0
    info:    limit the frames per second
calib_path:=<string>
    default: /home/wiedemeyer/work/src/iai_kinect2/kinect2_bridge/data/
    info:    path to the calibration files
use_png:=<bool>
    default: false
    info:    Use PNG compression instead of TIFF
jpeg_quality:=<int>
    default: 90
    info:    JPEG quality level from 0 to 100
png_level:=<int>
    default: 1
    info:    PNG compression level from 0 to 9
depth_method:=<string>
    default: cuda
    info:    Use specific depth processing: default, cpu, opengl, opencl, cuda, clkde, cudakde
depth_device:=<int>
    default: -1
    info:    openCL device to use for depth processing
reg_method:=<string>
    default: opencl
    info:    Use specific depth registration: default, cpu, opencl
reg_device:=<int>
    default: -1
    info:    openCL device to use for depth registration
max_depth:=<double>
    default: 12.0
    info:    max depth value
min_depth:=<double>
    default: 0.1
    info:    min depth value
queue_size:=<int>
    default: 2
    info:    queue size of publisher
bilateral_filter:=<bool>
    default: true
    info:    enable bilateral filtering of depth images
edge_aware_filter:=<bool>
    default: true
    info:    enable edge aware filtering of depth images
publish_tf:=<bool>
    default: false
    info:    publish static tf transforms for camera
base_name_tf:=<string>
    default: as base_name
    info:    base name for the tf frames
worker_threads:=<int>
    default: 4
    info:    number of threads used for processing the images
3. iai-kinect2使用示例
经过上面的介绍,我们对于如何使用iai-kinect2来获得深度图像和点云应该有了认识,下面我们就给出几个使用的例子。
其实使用的具体流程很简单,就是去订阅HD、QHD、SD话题中的消息,然后使用CV_Bridge转换成OpenCV的图像,然后再使用OpenCV进行视频图像的处理。
A. 图像显示
下面的这个程序是通过接受命令行参数来实现显示的节点,利用这个程序可以显示每个话题下的图像。不过有一个小问题是我本来想做的是可以同一时间多个窗口显示多个图像,这样效果会好很多。但是由于我电脑性能的问题跑起来很卡,但是显示单独的话题倒是很不错
#! /home/jack/anaconda3/envs/ros/bin/python

""" 命令行快捷查看iai-kinect2图像的节点 """

"""
@author: Jack Wang
@copyright: Jack Wang
@date: 2021-11-20
"""

from os import read
import sys
import argparse
from typing import List

import cv2
import numpy as np


for path_idx in range(len(sys.path)):
    if "2.7" in sys.path[path_idx]:
        temp = sys.path.pop(path_idx)
        break
sys.path.append(temp)

import rospy
from cv_bridge import CvBridge
from sensor_msgs.msg import Image, CompressedImage


class iaiKinect2Viewer(object):
    bridge = CvBridge()
    def __init__(self, args) -> None:
        super().__init__()
        self.subcribers: List[rospy.Subscriber] = []
        self.windows_idx = 0
        assert len(args.topic) % len(args.quality) == 0, f"话题数不匹配"
        group_num = len(args.topic) // len(args.quality)
        for quality in args.quality:
            for i in range(group_num):
                temp_topic = args.topic.pop(0)
                self.add_subscriber(quality, temp_topic)

    def add_subscriber(self, quality: str, topic: str):
        assert quality in ["sd", "qhd","hd"], f"无效的话题组"
        print(quality, topic)
        topic = topic.split("_")
        prefix = "/kinect2"
        if "color" in topic and "rect" in topic and "compressed" not in topic:
            self.subcribers.append(rospy.Subscriber(name="/".join([prefix, quality, "image_color_rect"]), data_class=Image, callback=self.show_images, queue_size=10, callback_args=self.windows_idx))
            self.windows_idx += 1
        elif "color" in topic and "rect" in topic and "compressed" in topic:
            self.subcribers.append(rospy.Subscriber(name="/".join([prefix, quality, "image_color_rect","compressed"]), data_class=CompressedImage, callback=self.show_compressed_image, queue_size=10, callback_args=self.windows_idx))
            self.windows_idx += 1
        elif "color" in topic and "rect" not in  topic and "compressed" not in topic:
            self.subcribers.append(rospy.Subscriber(name="/".join([prefix, quality, "image_color"]), data_class=Image, callback=self.show_images, queue_size=10, callback_args=self.windows_idx))
            self.windows_idx += 1
        elif "color" in topic and "rect" not in  topic and "compressed" in topic:
            self.subcribers.append(rospy.Subscriber(name="/".join([prefix, quality, "image_color", "compressed"]), data_class=CompressedImage, callback=self.show_compressed_image, queue_size=10, callback_args=self.windows_idx))
            self.windows_idx += 1
        elif "depth" in topic and "compressed" not in topic:
            self.subcribers.append(rospy.Subscriber(name="/".join([prefix, quality, "image_depth_rect"]), data_class=Image, callback=self.show_images, queue_size=10, callback_args=self.windows_idx))
            self.windows_idx += 1
        elif "depth" in topic and "compressed" in topic:
            self.subcribers.append(rospy.Subscriber(name="/".join([prefix, quality, "image_depth_rect", "compressed"]), data_class=CompressedImage, callback=self.show_compressed_image, queue_size=10, callback_args=self.windows_idx))
            self.windows_idx += 1
        elif "mono" in topic and "rect" in topic and "compressed" not in topic:
            self.subcribers.append(rospy.Subscriber(name="/".join([prefix, quality, "image_mono_rect"]), data_class=Image, callback=self.show_images, queue_size=10, callback_args=self.windows_idx))
            self.windows_idx += 1
        elif "mono" in topic and "rect" in topic and "compressed" in topic:
            self.subcribers.append(rospy.Subscriber(name="/".join([prefix, quality, "image_mono_rect","compressed"]), data_class=CompressedImage, callback=self.show_compressed_image, queue_size=10, callback_args=self.windows_idx))
            self.windows_idx += 1
        elif "mono" in topic and "rect" not in  topic and "compressed" not in topic:
            self.subcribers.append(rospy.Subscriber(name="/".join([prefix, quality, "image_mono"]), data_class=Image, callback=self.show_images, queue_size=10, callback_args=self.windows_idx))
            self.windows_idx += 1
        elif "mono" in topic and "rect" not in  topic and "compressed" in topic:
            self.subcribers.append(rospy.Subscriber(name="/".join([prefix, quality, "image_mono", "compressed"]), data_class=CompressedImage, callback=self.show_compressed_image, queue_size=10, callback_args=self.windows_idx))
            self.windows_idx += 1
        elif "ir" in topic and "rect" in topic and "compressed" not in topic:
            self.subcribers.append(rospy.Subscriber(name="/".join([prefix, quality, "image_ir_rect"]), data_class=Image, callback=self.show_images, queue_size=10, callback_args=self.windows_idx))
            self.windows_idx += 1
        elif "ir" in topic and "rect" in topic and "compressed" in topic:
            self.subcribers.append(rospy.Subscriber(name="/".join([prefix, quality, "image_ir_rect","compressed"]), data_class=CompressedImage, callback=self.show_compressed_image, queue_size=10, callback_args=self.windows_idx))
            self.windows_idx += 1
        elif "ir" in topic and "rect" not in  topic and "compressed" not in topic:
            self.subcribers.append(rospy.Subscriber(name="/".join([prefix, quality, "image_ir"]), data_class=Image, callback=self.show_images, queue_size=10, callback_args=self.windows_idx))
            self.windows_idx += 1
        elif "ir" in topic and "rect" not in  topic and "compressed" in topic:
            self.subcribers.append(rospy.Subscriber(name="/".join([prefix, quality, "image_ir", "compressed"]), data_class=CompressedImage, callback=self.show_compressed_image, queue_size=10, callback_args=self.windows_idx))
            self.windows_idx += 1
        else:
            assert False, f"无效的参数:qualitt={quality}, topic={topic}"

    def show_images(self, img, window_idx):
        cv_img = self.bridge.imgmsg_to_cv2(img_msg=img)
        cv2.imshow(f"viewer_{window_idx}", cv_img)
        if cv2.waitKey(1) == 27:
            cv2.destroyAllWindows()
            rospy.signal_shutdown(reason="pressed esc")

    def show_compressed_image(self, img: CompressedImage, windows_idx):
        cv_img = self.bridge.compressed_imgmsg_to_cv2(cmprs_img_msg=img)
        cv2.imshow(f"viewer_{windows_idx}", cv_img)
        if cv2.waitKey(1) == 27:
            cv2.destroyAllWindows()
            rospy.signal_shutdown(reason="pressed esc")


def arg_parser() -> argparse.Namespace:
    parser = argparse.ArgumentParser(description="本程序用于可视化显示iai-kinect2的不同话题中的图片,以对比他们的不同")
    parser.add_argument("-q", "--quality", dest="quality", nargs="*", type=str, help="指定需要显示图像的话题组")
    parser.add_argument("-t", "--topic", dest="topic", nargs="+", type=str, help="指定需要显示图像的话题")

    return parser.parse_args()


if __name__ == "__main__":
    args = arg_parser()
    print(args.quality, args.topic)
    rospy.init_node(name="ini_kinect2_viewer")
    viewer = iaiKinect2Viewer(args=args)
    rospy.spin()
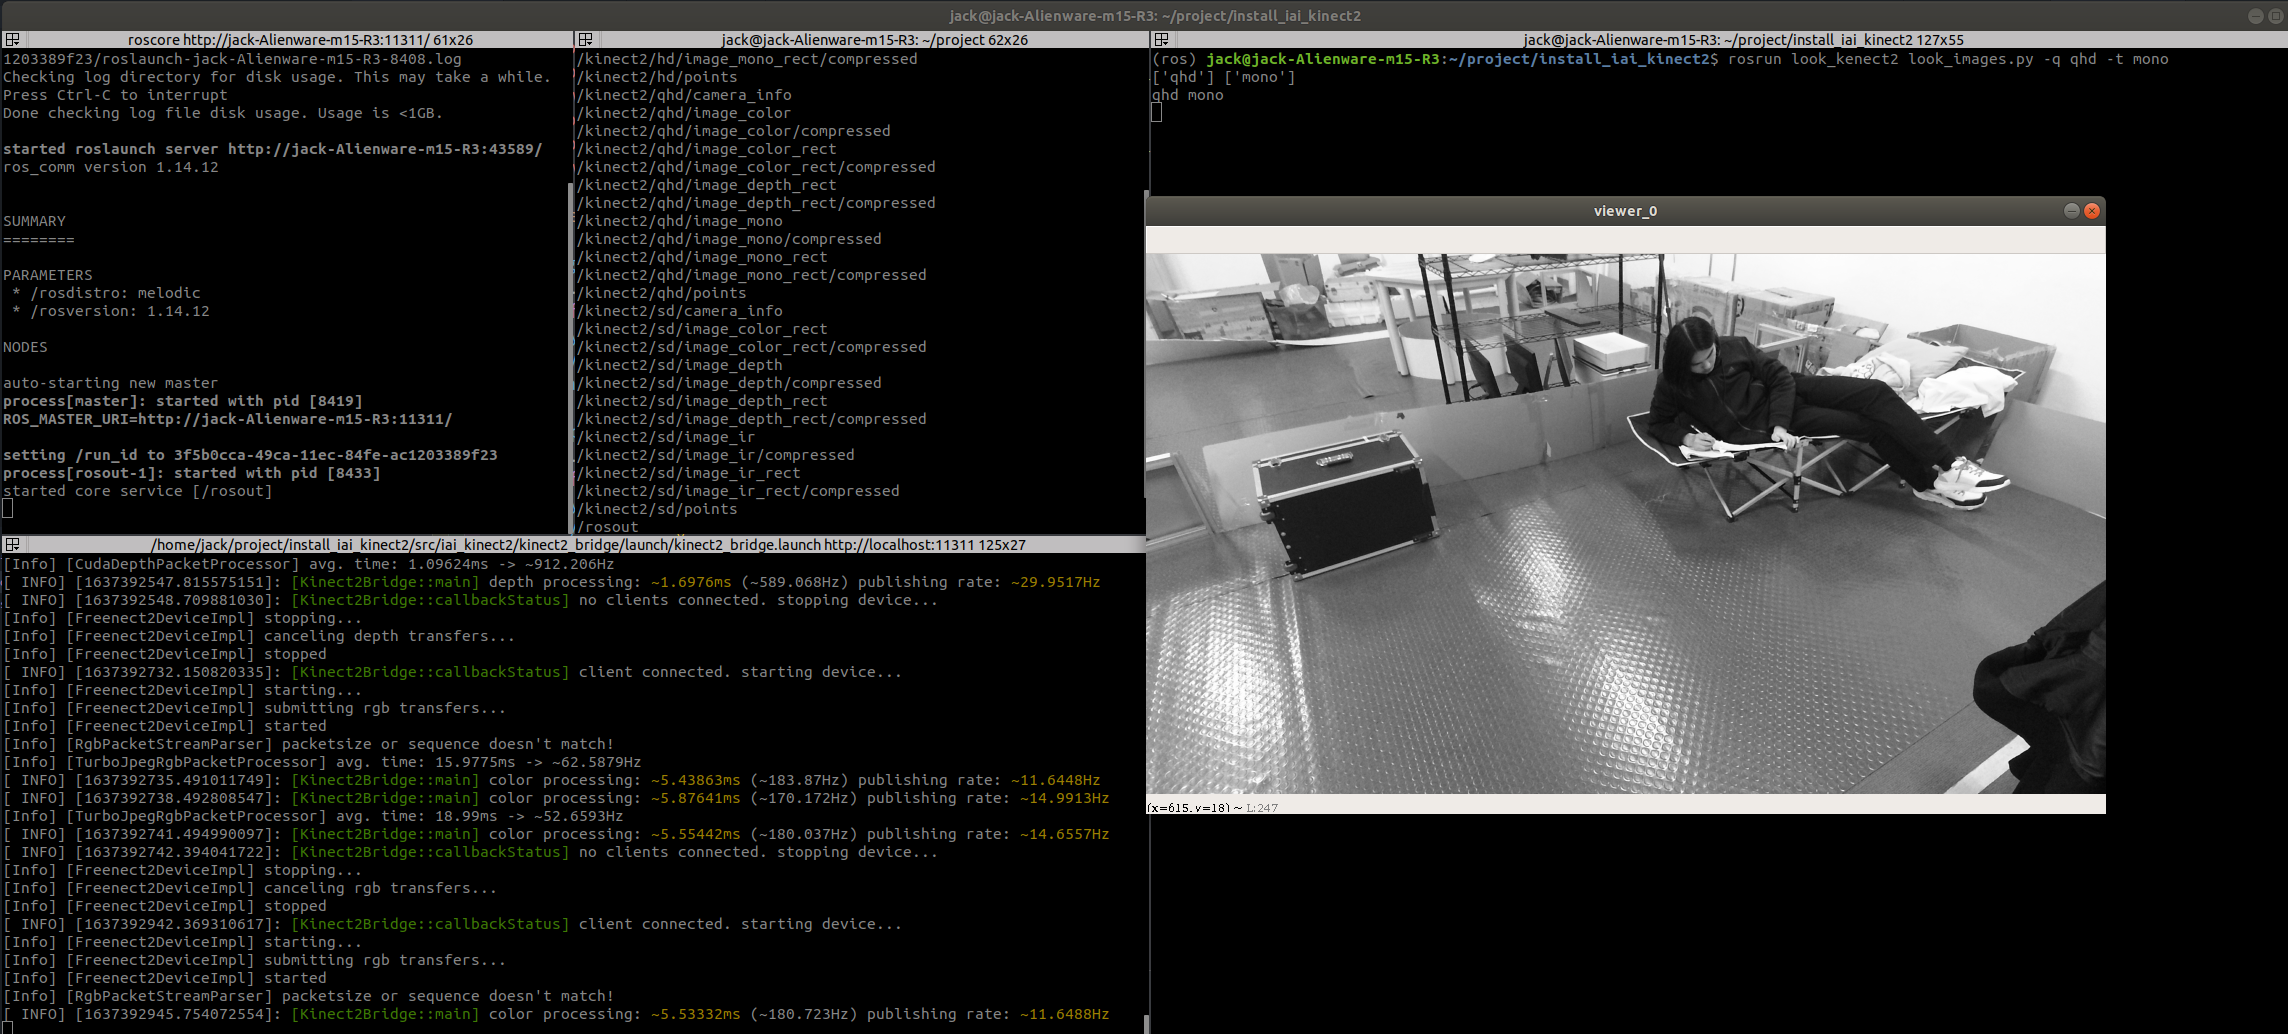
使用的话则在命令行中加上参数,-q表示图像的质量,即qhd、sd还是hd,-t表示显示的话题。写的时候是支持多个话题同时显示的,但是不知道哪里出问题了显示不出来
# 显示单个话题的图像:1/4 大小的灰度图
(ros) jack@jack-Alienware-m15-R3:~/project/install_iai_kinect2$ rosrun look_kenect2 look_images.py -q qhd -t mono
# 显示单个话题的图像:1/4 大小的彩色图
(ros) jack@jack-Alienware-m15-R3:~/project/install_iai_kinect2$ rosrun look_kenect2 look_images.py -q qhd -t color

# 显示单个话题的图像:1/4 大小的深度图
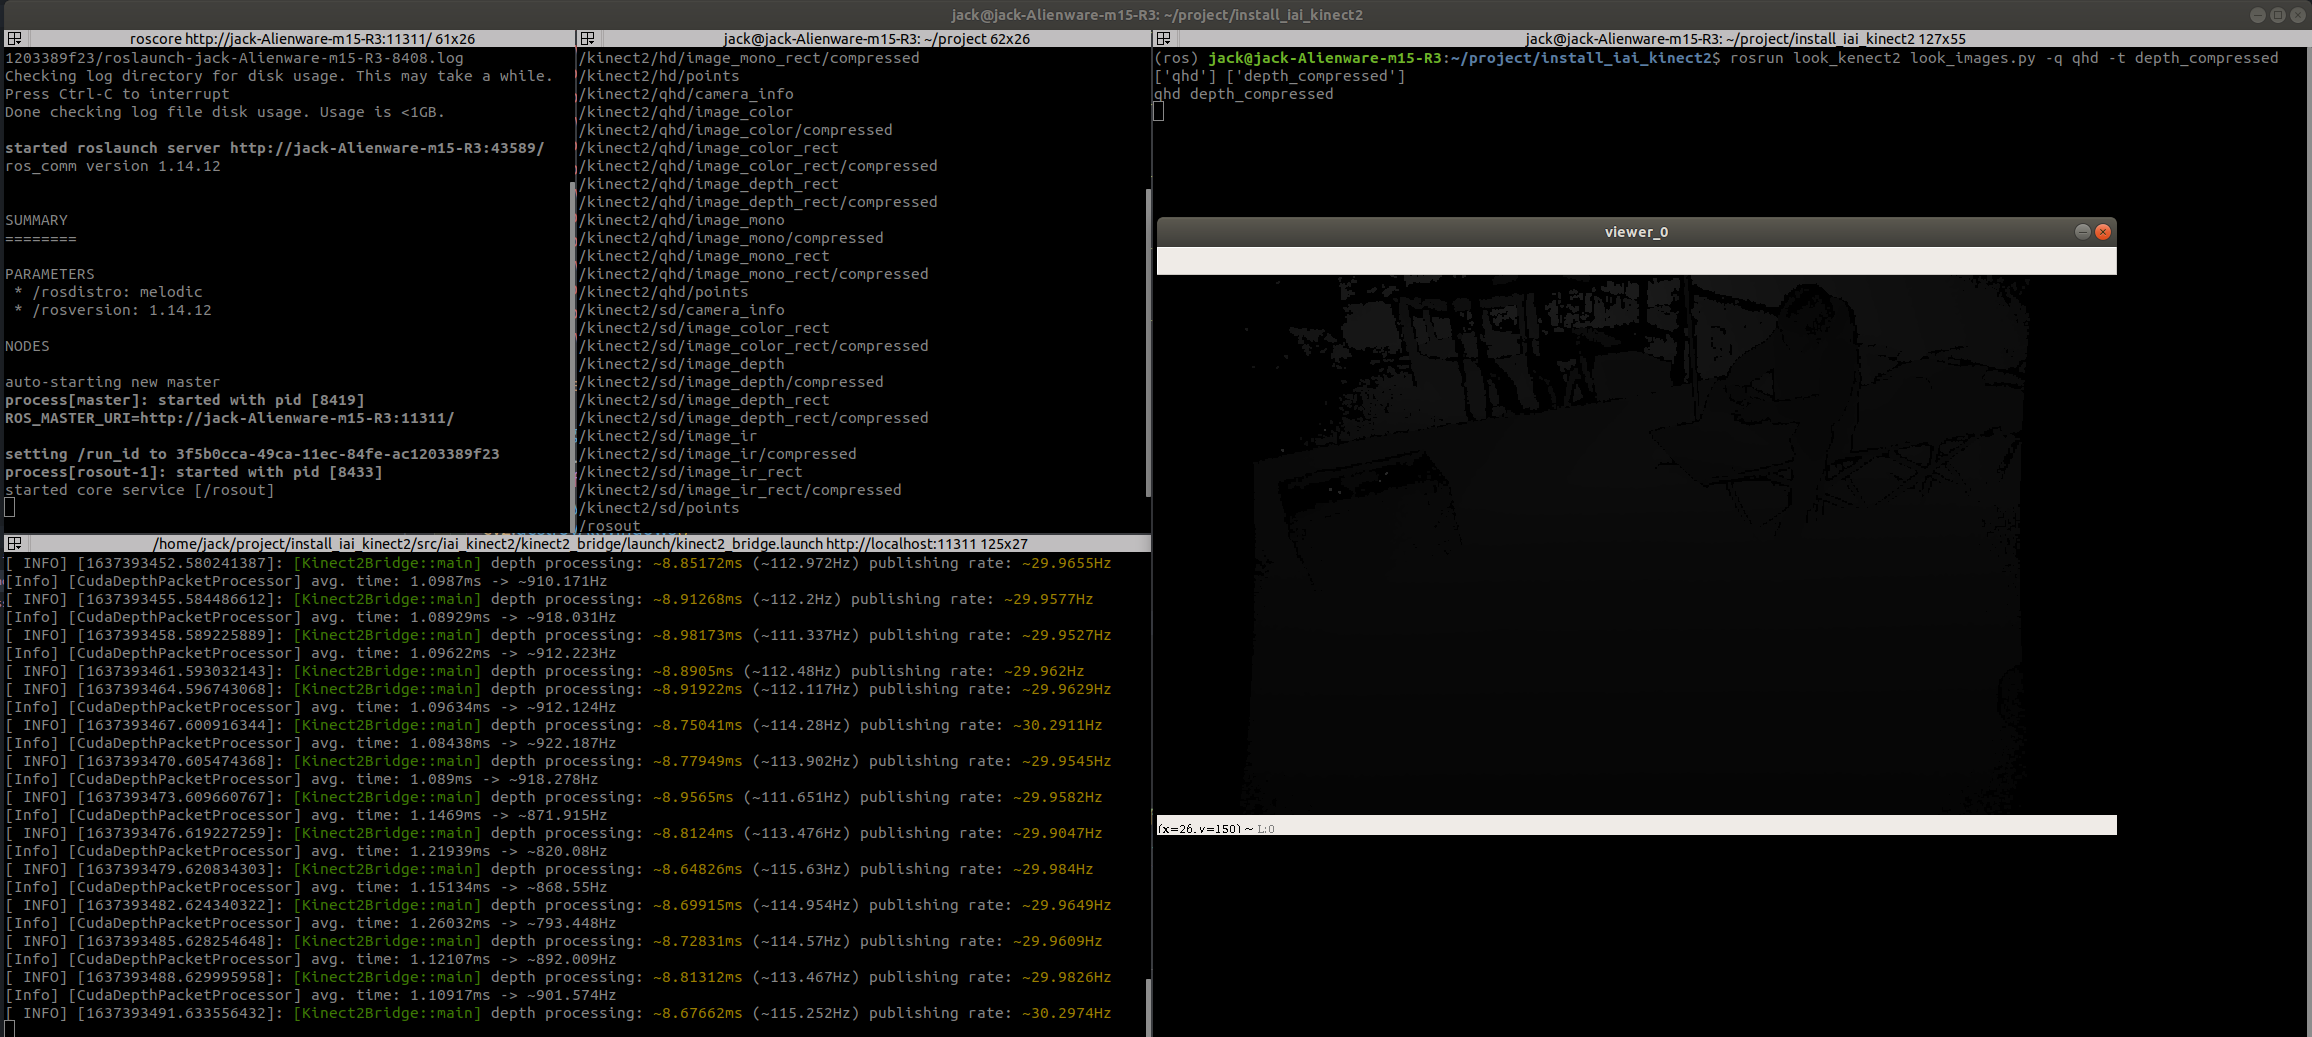
(ros) jack@jack-Alienware-m15-R3:~/project/install_iai_kinect2$ rosrun look_kenect2 look_images.py -q qhd -t depth_compressed
需要说明的是,qhd和hd中的深度图像如果不用compressed,即直接用的kinect采集到的的点的话,那么显示的非常卡,因为点云的数据实在是太大了,用而compressed中的数据则是iai-kinect2经过OpenCL、CUDA加速渲染之后得到的,因此帧率比较高。此外获取到的深度图每个像素都是一个以毫米为单位的距离值,因此使用OpenCV直接显示的话被做了归一化,所以越近的地方越黑,越远的地方越白,一些异常点,即没有反射的点距离被认为是摄像头获取距离的极限值(>1200,即超过12米),因此这些异常点使得归一化之后基本都是黑的,我们自己使用的时候一定要先处理异常点然后再归一化,最后再显示
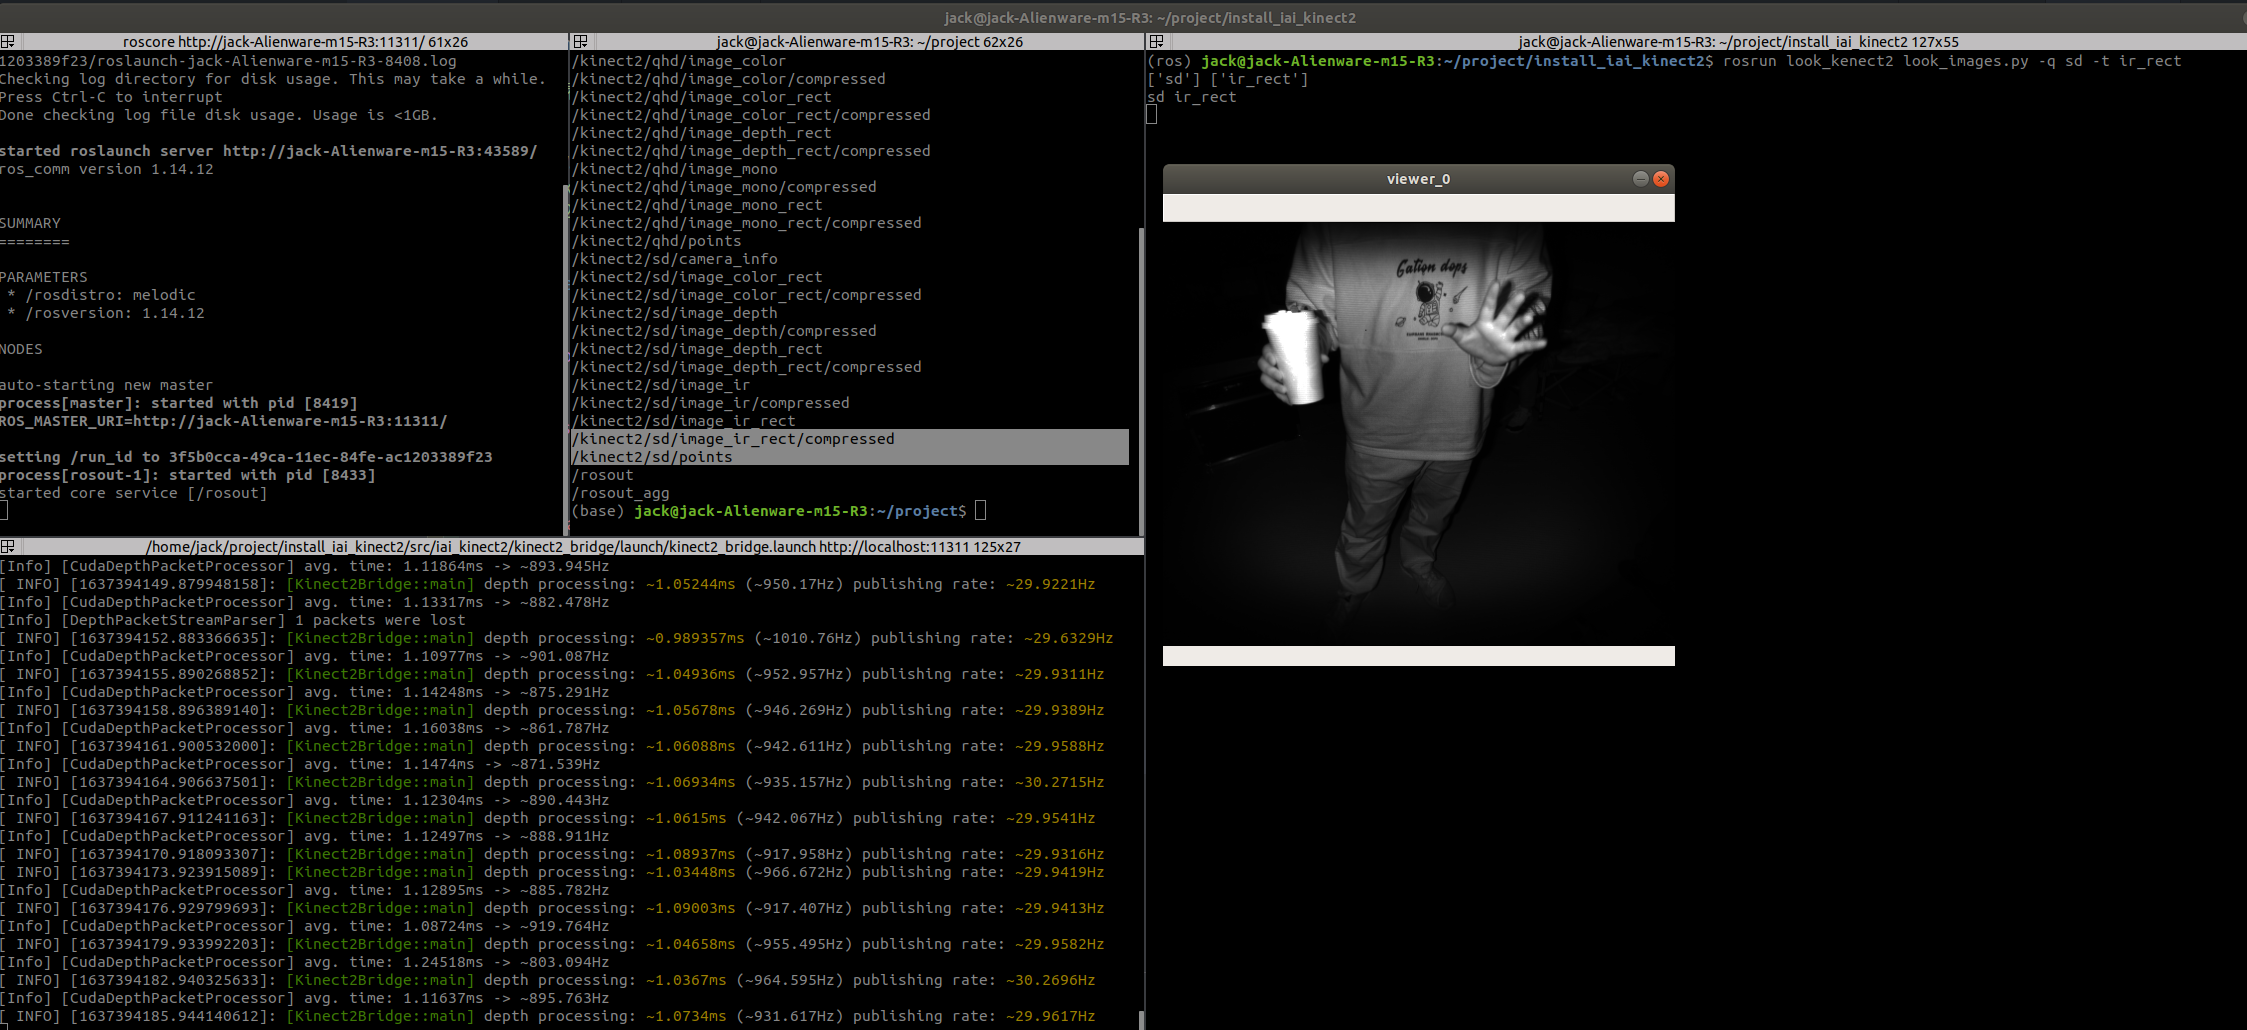
# 显示单个话题的图像:sd大小的红外图像
(ros) jack@jack-Alienware-m15-R3:~/project/install_iai_kinect2$ rosrun look_kenect2 look_images.py -q sd -t ir_rect
需要说明的是,Kinect V2相机有一个红外发射器,一个红外接收器,因此距离越近,表面越光滑,接收器接收到反射的红外线越强,数值越高,对应就越白
# 显示单个话题的图像:sd大小的色彩图
^(ros) jack@jack-Alienware-m15-R3:~/project/install_iai_kinect2$ rosrun look_kenect2 look_images.py -q sd -t color_rect
理论上来说,sd话题里显示的都是红外相机拍摄得到的图片,因此不会存在颜色,所以这里其实是把RGB相机拍到的图片和红外相机图片配准之后的结果

B. YOLO V5进行物体检测
利用之前写好的YOLO V5,可以实现物体检测,然后根据深度图像来标注出物体的距离
YOLO V5的代码后面整理出来会放出来,这里先用一用,下面的代码需要注意的是rospy中的message_filter如果消息频率速度过快,甚至快过了message_filter处理的速度,那么就会导致两个消息无法对应起来,因此就永远不会调用回调函数,因此cv2.waitkey需要等10毫秒左右
#! /home/jack/anaconda3/envs/ros/bin/python

import sys
import time
from pathlib import Path

import cv2
import numpy as np
from colorama import Fore, Style

from libyolo import YoloV5s

temp_path = None
for path_idx in range(len(sys.path)):
    if "2.7" in sys.path[path_idx]:
        temp_path = sys.path.pop(path_idx)
        break
if temp_path is not None:
    sys.path.append(temp_path)

import rospy
import message_filters
from sensor_msgs.msg import CompressedImage
from cv_bridge import CvBridge


class DetectYoloKinect(object):
    yolo = YoloV5s(weight_path=Path(__file__).resolve().parent.parent.joinpath("models", "yolov5s.pt"))
    bridge = CvBridge()
    font = cv2.FONT_HERSHEY_DUPLEX

    def __init__(self, rgb_img_topic: str, depth_img_topic: str, if_detection_only: bool = False) -> None:
        super().__init__()
        rospy.loginfo(msg=f"{Fore.GREEN}启动物体检测节点!{Style.RESET_ALL}")
        if if_detection_only:
            rospy.Subscriber(name=rgb_img_topic, data_class=CompressedImage, callback=self._detect_only_cb,
                             queue_size=10)
        else:
            rgb_subscriber = message_filters.Subscriber(rgb_img_topic, CompressedImage)
            depth_subscriber = message_filters.Subscriber(depth_img_topic, CompressedImage)
            sync = message_filters.ApproximateTimeSynchronizer(fs=[rgb_subscriber, depth_subscriber], queue_size=100,
                                                               slop=1)
            sync.registerCallback(self._multi_cb)
        self.last_time_rgb = time.time()

    def _detect_only_cb(self, img: CompressedImage):
        cv_image: np.ndarray = self.bridge.compressed_imgmsg_to_cv2(cmprs_img_msg=img)
        result_dict, draw_img = self.yolo.inference(cv_image, if_absolute=True, if_show=True)
        t2 = time.time()
        draw_img = cv2.putText(draw_img, f"fps: {1 / (t2 - self.last_time_rgb):>5.2f}, seq_id: {img.header.seq}",
                               (10, 20), self.font, 0.8, (0, 255, 0), 2)
        self.last_time_rgb = t2
        cv2.imshow("color_detections", draw_img)
        if cv2.waitKey(1) == 27:
            cv2.destroyAllWindows()
            rospy.logwarn("按下了ESC键,终止节点...")
            rospy.signal_shutdown(reason="pressed esc")

    def _multi_cb(self, rgb_img: CompressedImage, depth_img: CompressedImage):
        rospy.loginfo("Getting into _multi_cb")
        cv_rgb: np.ndarray = self.bridge.compressed_imgmsg_to_cv2(cmprs_img_msg=rgb_img)
        cv_depth: np.ndarray = self.bridge.compressed_imgmsg_to_cv2(cmprs_img_msg=depth_img)
        cv_depth_draw: np.ndarray = np.stack([cv_depth] * 3, axis=2)  # to BGR
        cv_depth_draw = (cv_depth_draw - cv_depth_draw.min()) / (cv_depth_draw.max() - cv_depth_draw.min())
        # inference
        result_dict, cv_rgb_draw = self.yolo.inference(cv_rgb, if_absolute=True, if_show=True)
        # log time
        t = time.time()
        fps = round(1 / (t - self.last_time_rgb), ndigits=2)
        self.last_time_rgb = t

        rospy.loginfo(msg="Done inference, start to draw")
        # draw basic info
        cv_rgb_draw = cv2.putText(cv_rgb_draw, f"FPS:{fps}, seq:{depth_img.header.seq}",
                                  org=(10, 20), fontFace=self.font, fontScale=0.8, color=(0, 255, 0), thickness=2)
        cv_depth_draw = cv2.putText(cv_depth_draw, f"FPS:{fps}, seq:{depth_img.header.seq}",
                                    org=(10, 20), fontFace=self.font, fontScale=0.8, color=(0, 255, 0), thickness=2)

        # draw depth
        rospy.loginfo(msg="Done draw basic, start draw depth")
        for d_type, items in result_dict.items():
            for item in items:
                # 周围100个点的平均,yolo的结果已经确保点在图像内
                depth = self.__get_depth((x := item[0]), (y := item[1]), depth_image=cv_depth, area_size=20)
                x, y = int(x), int(y)
                cv_depth_draw = cv2.putText(cv_depth_draw, text=f"{d_type}, {depth / 10:>.2f}m", org=(x, y-5),
                                            fontFace=self.font, fontScale=0.8, color=(0, 255, 0), lineType=2)
                cv_depth_draw = cv2.circle(cv_depth_draw, center=(x, y), radius=5, color=(0, 0, 255),
                                           thickness=2, lineType=2)
        rospy.loginfo(msg=f"Done Drawing")
        cv2.imshow("detection_result", cv_rgb_draw)
        cv2.imshow("depth_result", cv_depth_draw)
        if cv2.waitKey(10) == 27:
            cv2.destroyAllWindows()
            rospy.logwarn(msg=f"按下了ESC键,手动关闭了节点")
            rospy.signal_shutdown(reason="pressed esc")

    @staticmethod
    def __get_depth(x: float, y: float, depth_image: np.ndarray, area_size: int = 20) -> float:
        boundary = [int(position) for position in
                    [y - area_size / 2, y + area_size / 2, x - area_size / 2, x + area_size / 2]]
        return depth_image[boundary[0]:boundary[1], boundary[2]:boundary[3]].mean()


if __name__ == "__main__":
    rospy.init_node(name="detect_yolo_kinect2", anonymous=False)
    dyk = DetectYoloKinect(rgb_img_topic="/kinect2/qhd/image_color/compressed",
                           depth_img_topic="/kinect2/qhd/image_depth_rect/compressed", if_detection_only=False)
    rospy.spin()
最后得到的效果如下,可以看到YOLO还是可以的,不过有的时候会识别错误,例如把纸板识别成了沙发。而且在深度图中,越靠近边缘实际上越不准确,如果没有反射回来的话距离就被记为0。

